Every rain jacket makes the same promise: keep you dry. That promise lives or dies at the seams — the thin stitch lines where two fabric panels meet. Water gets in there fast if the construction isn't solid.
Most brands talk about waterproof membranes and DWR coatings. Few say much about the rain jacket seam welding process — the unglamorous, demanding manufacturing step that determines whether a jacket holds up in a real downpour or fails you at mile eight.
We've opened up our production floor to show you how we seal every seam on our men's rain jackets. Here's what we cover:
- The equipment we use
- Temperature and pressure settings
- Quality tests we run
- Defects we watch for
Sourcing outerwear for a brand? Or just want to know what "fully seam sealed" is worth paying for? This is the manufacturing detail that changes how you evaluate waterproof gear.
Why Seam Welding Is the Critical Factor in Rain Jacket Waterproof Performance
Needle holes are the enemy. A sewing machine punches thread through waterproof fabric and leaves a puncture — a tiny gap that water pressure will find and use. A jacket rated at 20,000mm hydrostatic head can still soak through at the shoulders if those holes go untreated. The membrane didn't fail. The seam construction did.
That's the gap between what a fabric rating promises and what a finished jacket delivers.
Stitching Undermines the Membrane It's Supposed to Protect
Waterproof fabrics work as continuous barriers. Stitching breaks that barrier — hundreds of times per seam. Without treatment, water travels along the thread path straight into the jacket interior. The failure point isn't random either. It's predictable: hood attachment, shoulder seams, chest yoke — the exact spots where rain runs off and pressure builds up.
Seam sealing and welding exist to fix what stitching breaks.
The difference in construction matters a lot:
- Critically seam sealed jackets tape the highest-exposure zones only — shoulders, hood, neck. Fine for light rain. Not enough for a heavy, sustained downpour.
- Fully seam sealed jackets tape every single seam. The tape's hydrostatic resistance matches the fabric's own rating. No weak points anywhere.
- Welded seams cut out needle holes altogether. Heat, pressure, or ultrasonic energy bonds panels together — no thread, no punctures, no seam tape needed over stitching that was never there to begin with.
Research comparing construction methods puts the performance gap in clear numbers. The USW-TATS method — ultrasonic welding combined with thermo-adhesive tape — beats both traditional sewn-and-taped construction and ultrasonic welding alone across every key metric: tear strength, hydrostatic pressure resistance, dimensional stability, and long-term durability.
That's not a small step forward. It's a different level of waterproof protection entirely.
Hot Air vs. Ultrasonic vs. Laser: Comparing Seam Welding Techniques for Men's Rain Jackets
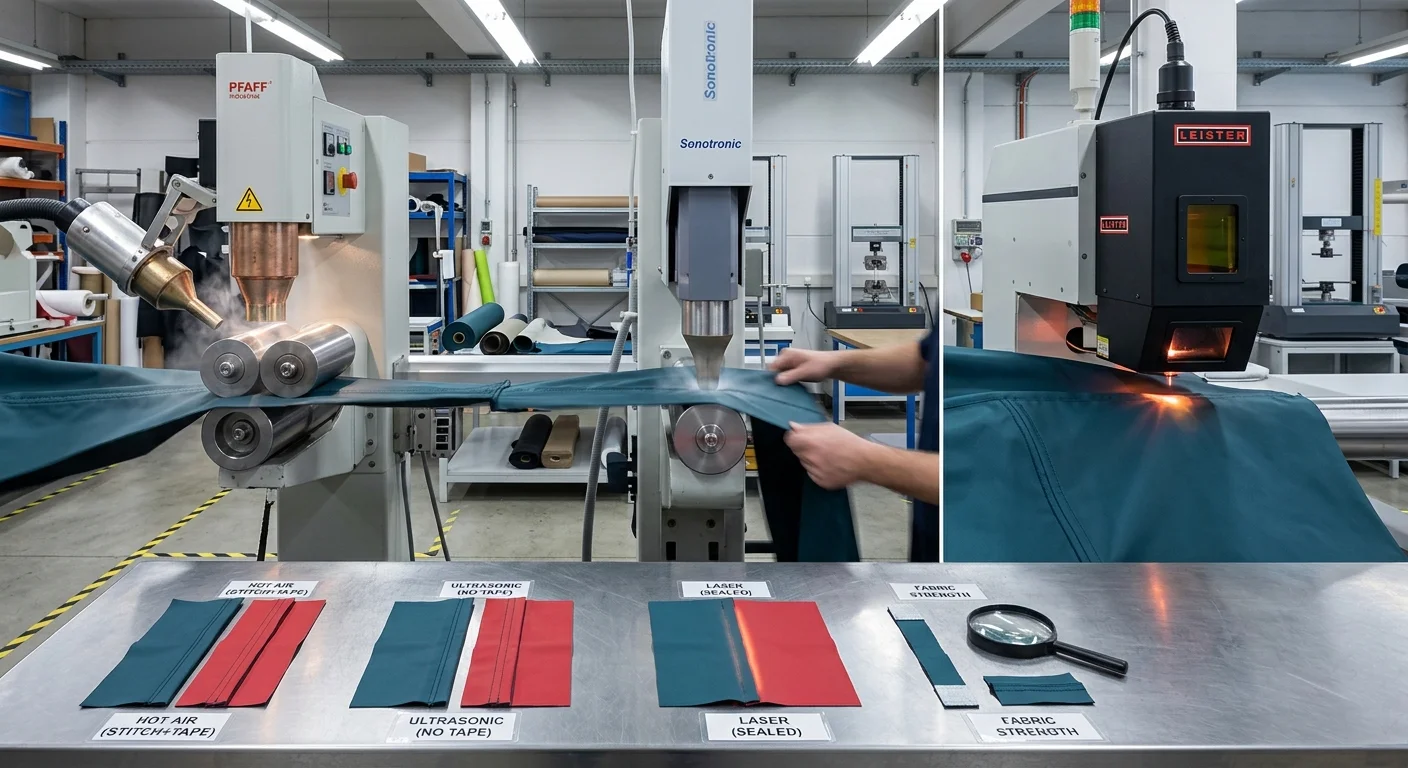
Three technologies dominate seam welding in men's rain jackets. Each one works on a different physical principle, hits a different price point, and delivers a different level of waterproof protection. Pick the wrong one for your fabric and construction — that's not a small mistake. It's the difference between a jacket that passes a hydrostatic head test and one that keeps someone dry in real rain.
Hot Air Welding: The Production Workhorse
Hot air welding pushes heated air — in the 300–500°C range — onto thermoplastic-coated surfaces like PU, PVC, or PE fabrics. Rollers then press the softened layers together. It runs fast at 10–30 meters per minute on straight seams. Equipment costs $5,000–$20,000, and the machines are portable. That combination makes it the go-to choice for high-volume PU raincoat production.
The tradeoff is a performance ceiling. Hot air seams reach 80–90% of base material strength. They top out around 10,000mm hydrostatic head on finished jackets. Seam failure rates sit at 5–10% under 5 PSI pressure. That's fine for budget-tier gear — but limiting for anything sold as serious outerwear.
Ultrasonic Welding: Where Waterproofing Gets Serious
Ultrasonic welding uses no external heat. High-frequency vibrations — 20–40kHz — create friction heat (200–300°C) right at the point where two fabric layers meet. The bond can exceed the base material strength itself. You get 15,000–20,000mm+ hydrostatic head with seam failure rates below 1%.
The numbers make it clear. Ultrasonic seams on coated nylon handle 2x the peel force of hot air bonds. Seam width drops to 3–10mm, cutting material use by 15%. That also trims 15–25 grams per seam — real weight savings across a full jacket. For lightweight synthetic shells and technical windbreakers, ultrasonic is the stronger technical call.
Laser Welding: Precision for Premium Construction
Laser welding uses a focused CO₂ or fiber beam (1–10kW) to melt fabric layers together. Accuracy sits at 0.1–1mm — tighter control than hot air or ultrasonic can offer. It handles material thicknesses from 0.01mm to 2mm. Plus, it fuses multiple layers cleanly without adhesives. That's why you see it in Arc'teryx-style prototypes and Gore-Tex equivalent constructions.
Waterproof performance reaches 10,000–25,000mm hydrostatic head with seam failure rates under 2%. The real constraint is speed. Laser welding runs at just 1–10 meters per minute, and equipment starts at $50,000+. It's not built for a high-volume production floor. It's a precision tool for premium, low-volume technical builds.
Side-by-Side: What the Numbers Show
| Hot Air | Ultrasonic | Laser | |
|---|---|---|---|
| Hydrostatic Head | 5,000–10,000mm | 15,000–20,000mm+ | 10,000–25,000mm |
| Seam Failure Rate | 5–10% at 5 PSI | <1% | <2% |
| Production Speed | 10–30 m/min | 5–20 m/min | 1–10 m/min |
| Equipment Cost | $5k–$20k | $10k–$50k | $50k+ |
| Weight Savings | ~10g/seam | 15–25g/seam | Variable |
The right choice depends on what you're building:
- High-volume PU jackets → hot air wins on cost and speed
- Lightweight synthetic shells → ultrasonic delivers better waterproof performance and a flat seam finish
- Premium multi-layer builds → laser fits best where precision matters more than throughput
For sourcing verification, check that any seam claiming full waterproof integrity passes AATCC 127 hydrostatic testing above 15,000mm. It should also show peel strength above 20N/cm. Hot air construction rarely hits those numbers.
Inside the Seam Welding Process: Temperature, Pressure, and Speed Parameters That Determine Waterproof Integrity
Get any single parameter wrong — temperature, pressure, speed — and the weld fails. Not later. Right away. Precision here isn't a goal. It's the baseline.
Here's what happens on the production line.
Temperature: The Activation Window Is Narrow
For PU and PVC membranes, the working range is 900–1100°F. That window sounds wide. It isn't. Too low, and the polymer chains never soften enough to fuse. Too high, and you've scorched the membrane. You'll see it as discoloration right away — but it also creates hidden structural damage underneath.
Temperature isn't a fixed setting either. It shifts based on conditions:
- Cold ambient temperature → increase heat to compensate for faster surface cooling
- Hot ambient temperature → reduce heat to prevent overrun
- Thicker membranes → higher temperature, slower speed to allow full heat penetration
The goal is activation without destruction. You need just enough heat to make polymer chains mobile and able to interlock — nothing more.
Speed: 3 Meters Per Minute Is the Signal
For most rain jacket seams, the target welding speed is around 3 meters per minute. The visual signal? A small, steady bead of melted material forming at the seam edge. That bead confirms the heat is reaching full depth across the weld zone.
Run too fast and the heat doesn't penetrate. The surface fuses. The interior doesn't. The seam looks fine. It will fail under pressure.
Run too slow and you're pushing too much heat into the material. It deforms. The seam profile turns uneven. Hydrostatic performance drops — even though the bond looks intact from the outside.
Speed also shapes heat distribution across the full seam length. Even small speed variations create weak zones. Those zones show up later in peel adhesion tests.
Pressure: The Variable That Finalizes the Bond
Heat activates the polymer. Pressure locks the bond in place.
Silicon and steel rollers press down right behind the welder. They push the softened layers together before cooling starts. The pressure must be firm, consistent, and even across the full seam width. Any gap in roller contact leaves a matching gap in the finished weld — a wrinkle, a void, a leak path.
The mechanical principle matters here. Rotating electrodes hold constant contact resistance across the seam. That steady resistance lets molten material solidify into one continuous structure — not two layers just sitting against each other.
No amount of correct heat fixes insufficient pressure. And correct pressure does nothing without sufficient heat. The two variables depend on each other. Modern welding machines handle a wide range of material setups — but the operator still has to dial both settings right for each specific fabric build.
What a Proper Weld Creates
Get temperature, speed, and pressure dialed in together, and something specific happens at the molecular level. Polymer chains from both fabric panels interlock and fuse. After cooling, the seam isn't a joint anymore. It's continuous material.
That difference matters for long-term waterproof performance:
- Adhesive-based seams depend on glue or tape integrity. Both break down over time — through UV exposure, repeated flex cycles, and washing.
- Welded seams don't depend on adhesives. The bond is the material itself. Abrasion resistance matches the original fabric. Waterproof performance holds up with use.
A well-welded seam on a men's rain jacket won't separate without tearing the membrane around it. That's not a marketing claim. That's the physics of polymer fusion.
Pre-Production Testing Protocol
Before any production run starts, the machine gets tested on scrap panels. Every time. The checklist:
- Heat stable — temperature holding at target without fluctuation
- Material aligned — seam tracking straight without drift
- No discoloration — surface showing no burn marks or color shift
- Uniform seam profile — bead formation consistent from start to finish
Testing also runs after big weather changes — especially temperature swings that change how fast the membrane surface cools after the welder passes. A setup that worked at 9am may need adjustment by early afternoon on a warm day.
Cooling is the final step that gets rushed most often. Don't rush it. Seams need to set fully before any tension or stress testing. Pull a weld apart while it's still warm and you won't get an accurate read on bond strength. Disturb it during solidification and it may never reach full strength at all.
How We Test Seam-Welded Joints: Water Pressure Testing and Quality Control Standards
A finished seam proves nothing. The weld looks clean on the surface, the tape sits flat, the profile is uniform — and it can still fail at 8 PSI. Testing is where we find out what went wrong during production.
Here's the exact sequence we run on every seam-welded joint before a jacket ships.
The 1-Inch Sample Test: What Happens Before Full-Jacket Inspection
Before a full production run reaches hydrostatic testing, we pull seam samples. Cut a 1-inch-wide strip straight across the weld — longer than the seam width. Let it cool for a full 10 minutes. Then peel it apart by hand.
A good weld shows a minimum 1.5-inch bond width. Delamination should pull away from the scrim layer. The weld should not separate at the interface. A bond that peels apart at the seam line means the fusion was incomplete. The heat didn't penetrate deep enough. You'll catch this failure in 30 seconds with a sample cut.
This test runs at the start of every production shift. It also runs after any machine adjustment, temperature change, or material lot switch.
Hydrostatic Pressure Testing: The Number That Matters
The water pressure test is simple. We fill the test vessel, pressurize to 1.5x design pressure, and hold. For rain jacket seam validation, we target sustained performance above 15,000mm hydrostatic head. That's the threshold that separates fully seam-sealed construction from partially seam-sealed.
We add dye to the water. Any seam leak shows up as color migration. No guesswork involved.
Seams that pass the hydrostatic stage move to a stepped air-pressure check at 0.4–0.5 MPa. Soapy solution goes on the seam exterior. One bubble means a pinhole — and a pinhole in a rain jacket seam is a guaranteed needle hole waterproof leakage point under real rain conditions.
Seam Probing: The Physical Verification Step
Water testing tells you whether a seam leaks under controlled pressure. Seam probing tells you where the bond is weak before any leak starts.
The probe tip runs along the seam edge with firm, steady pressure. Focus on the junction between seam tape and membrane — not the bottom membrane layer. Any soft spot, edge lift, or section where the bond gives under probe pressure gets flagged. That seam comes off the line.
This step catches what water testing misses: micro-delamination zones where the bond looks solid but won't hold up through repeated flex cycles or washing.
What Quality Control Catches
Three failure types show up most in seam-welded outerwear:
- Incomplete fusion — heat didn't reach full depth; the sample peel test reveals this in seconds
- Edge voids — uneven roller pressure left unbonded zones at seam margins; probing finds these
- Thermoplastic tape disbonding — adhesion failure between hot air seam sealing tape and the waterproof membrane; the soap bubble test pinpoints the exact positions
Any seam flagged by any test method gets cut out and re-welded. The jacket doesn't move forward. The numbers tell the story: seams that pass all three stages — sample peel, hydrostatic pressure hold, and probe check — show field failure rates below 1%. That's the standard ultrasonic construction holds to. Hot air construction, without the same level of QC, runs 5–10% failure rates under 5 PSI. The testing protocol isn't a separate step from seam quality. It's what produces seam quality.
How to Inspect Seam Welding Quality on a Rain Jacket: A Practical Checklist for Buyers
Knowing the process is one thing. Being able to evaluate the result in your hands — that's where sourcing decisions get made.
At a factory inspection or pulling a jacket off a retail rack, these checkpoints let you assess seam welding quality without specialized lab equipment. All you need is good lighting, steady hands, and a clear sense of what you're looking for.
The Conditions That Make Inspection Accurate
Start here. Skipping setup makes everything else unreliable. You need at least 1000 lux of light — a phone flashlight works in a pinch, but a proper inspection light is better. Position yourself within 600mm of the seam. Check at a minimum 30-degree angle to the surface. Flat, straight-on viewing hides the defects you're trying to catch.
Five Things to Check on Every Seam
1. The bead profile. A good weld bead sits centered, runs straight, and holds consistent width. Variation above 10% along the seam length is a red flag. A wandering bead — more than 2mm off-center — points to unstable machine tracking or inconsistent material feed.
2. The ripple pattern. Even, uniform ripples across the seam surface show steady speed and temperature. Clustered or irregular ripples mean the welding parameters were shifting. That leads to inconsistent bond strength.
3. Pinholes and porosity. Look for gas bubbles in the seam surface. Industry threshold: reject any seam showing more than 3 pinholes per 100mm, or any pore exceeding 0.5mm diameter. Zero tolerance on visible cracks — any hairline split is a disqualifying defect.
4. Edge undercut. Run your fingernail along the seam margin. A groove deeper than 0.5mm at the seam edge means the weld overran its bond zone. That's a structural weak point. Water pressure will find it.
5. The flex test. Bend the seam 90 degrees. Hold it. A solid weld returns flat — no delamination, no surface cracking, no edge lift. Tape that peels or a bond that gives at the fold means the weld didn't reach full fusion depth.
Quick Reference: Good Weld vs. Bad Weld
| Feature | Good Weld | Bad Weld |
|---|---|---|
| Bead placement | Stable, centered | Wandering >2mm |
| Ripple pattern | Even, consistent | Irregular, clustered |
| Seam termination | Clean ends | Excess reinforcement >2mm |
| Surface condition | Smooth, no discoloration | Heat tint, contamination halos |
The Practical Water Test
For a fast field check: spray water on the sealed seam and hold pressure for five minutes. No penetration means the thermoplastic seam tape application achieved continuous coverage. Any moisture migration — check the inside face of the jacket — shows you the exact spot where the bond failed.
Buyers with access to testing equipment can run a vacuum pressure hold test. Inject air behind the seam, monitor with a manometer, and look for sustained pressure above 30 seconds. A pressure drop means a void exists somewhere in the weld cross-section.
The Number That Confirms Everything
Visual inspection catches surface defects. Geometry measurements — throat thickness minimum 1–2mm, leg length consistent to ±0.5mm — confirm structural adequacy. The number that settles the question, though, is hydrostatic performance. Any seam claiming full waterproof integrity should clear 15,000mm hydrostatic head under AATCC 127 testing, with peel strength above 20N/cm. Ask for test data. A supplier confident in their welded seams vs taped seams construction will have it on file.
What Separates Budget from Premium Rain Jackets: Real Differences in Seam Welding Craftsmanship
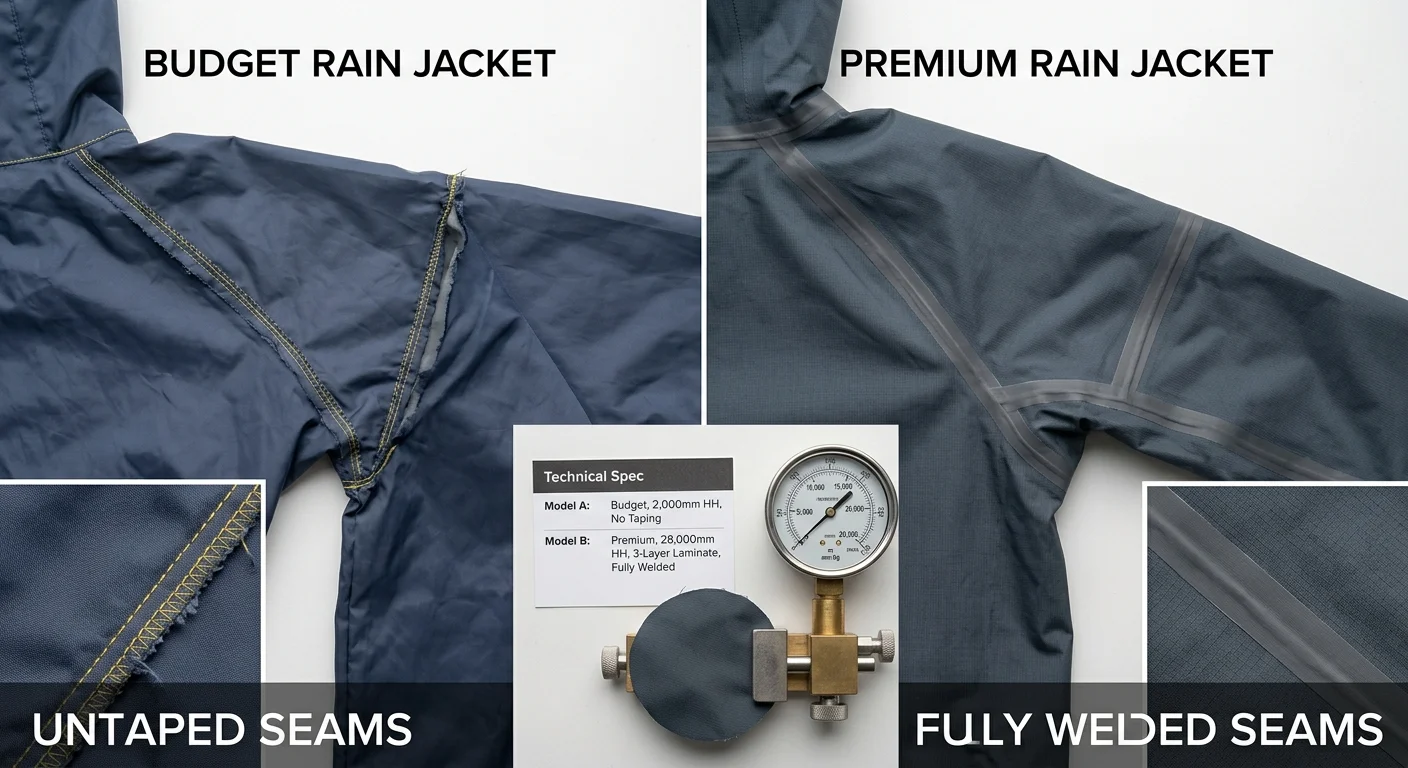
Price differences in rain jackets aren't random. The gap between a $80 jacket and a $400 one comes down to seam construction choices made during manufacturing. Those choices decide whether your jacket fails in 20 minutes or holds up through a full day of heavy rain.
Here's how the tiers break down.
Budget jackets (under $100) skip seam sealing or cover only the shoulders and hood — nothing else. Stitch holes in the side panels, underarm seams, and chest yoke stay untreated. Under sustained rain pressure, water finds those holes fast.
Mid-market jackets ($120–$200) reach critical seam sealing on the main stress points. That's better than nothing. But gaps in the side and underarm seams still exist. For fishing, hiking in a downpour, or standing in heavy rain for more than an hour, those gaps become a real problem.
Premium jackets ($300–$500+) tape every seam or weld panels together with no needle holes at all. A 3-layer construction at $500+ bonds a membrane sandwich between fabric layers and seals every seam on top of that. That's what makes a 20,000mm hydrostatic head rating mean something in practice — because fabric ratings count for nothing if the seams start leaking at 5,000mm.
The hydrostatic head benchmarks line up with construction tier like this:
| Hydrostatic Rating | Conditions | Seam Construction |
|---|---|---|
| 5,000mm | Light rain | Minimal or no sealing |
| 10,000mm | Recreational/heavy rain | Critically taped |
| 20,000mm+ | Extreme/prolonged exposure | Fully taped or welded |
Welded seams sit above even fully taped construction. No needle holes means no seam tape working to compensate for punctures that were already there. The waterproof membrane bonding stays intact from day one.
Evaluating a jacket at retail or during a factory inspection? Run these four checks:
- Confirm "fully seam sealed" appears in the spec sheet — in plain language, not buried in marketing copy
- Check seams beyond the hood and shoulders with your hands
- Pass on any jacket labeled "water-resistant" or "critically taped" for serious-use applications
- Look for welded construction if you need maximum protection without relying on adhesive tape
Seam construction is the strongest single predictor of long-term waterproof reliability. A high fabric rating won't save a jacket with untreated stitch lines.
How to Maintain and Repair Seam-Welded Rain Jackets for Long-Term Waterproofing
Even a well-welded seam won't last forever. UV exposure, repeated washing, and flex cycles all wear down the bond over time — not in one go, but little by little. Spot the early signs and you can restore full waterproof performance without buying a new jacket.
Preventive Resealing: Don't Wait for a Leak
Reseal the high-stress zones every 2–3 seasons under regular use. Focus on shoulders, hood attachment points, and underarms. This is cheap protection against needle hole waterproof leakage that builds up as adhesive layers age.
Use Gear Aid Seam Grip WP on the exposed seam. Apply 1–2 coats — inside or outside, depending on your seam type. Flat-felled seams are easier to treat from the outside. Let it cure overnight. Then dust talc powder over the surface so it won't stick to itself.
Repairing Delaminated Seam Tape
Hot air seam sealing tape lifting at the edges? Don't pull it back further. Clean the area first. Press the tape back down with a low iron set to wool. Run the iron edge from the seam center outward, then press the edge flat with a fingernail. This works well on seams under 20 years old. Older tape may need full replacement.
For delamination on welded zones — pit zips and underarm panels fail most often — use a heat source to soften the area. Then apply Seam Grip WP to the spot, realign the layers, press flat, and leave it weighted overnight.
Patching Tears Without Compromising the Membrane
Start by cleaning the damaged area. Cut a patch 1–2cm larger than the tear on all sides. Round the corners — this stops edge peel from starting. Place the patch on the outside of the fabric.
Lay a cotton cloth over it and press with a wool-setting iron. Don't go higher than that. Too much heat damages the waterproof membrane bonding you're trying to save.
For tricky repair spots like underarms or shoulder seams, break the work into small sections. Use a smooth, padded surface underneath. Rushing through a curved seam creates wrinkles — and wrinkles turn into leak paths fast.
Conclusion
A hangtag doesn't make a jacket waterproof. The welds do.
Every detail covered here has a direct impact on whether you stay dry or not. The temperature dial on the hot air welder. The pressure settings. The tape overlap. The hydrostatic head test that passes or fails — no middle ground. Each one feeds into a single outcome: real protection when the rain hits hard.
Now you have the tools to check it yourself. Run through the inspection checklist before you sign a purchase order. Press your thumb along the interior seams before you hand over your credit card. Fully seam sealed should carry a specific meaning to you now — not just words on a hang tag.
Sourcing men's rain jackets? Come see our seam welding process for yourself. Test data, facility walkthrough, sample evaluation — we offer all of it. We'd rather show you than tell you.
The rain doesn't care about promises. Neither should you.