Most kayak anglers learn the hard way. A cotton t-shirt soaked through by noon. Sunburn that ruins the next three days. Fingers too numb to tie a proper knot by mid-afternoon. The water doesn't care how experienced you are — dress wrong, and you're miserable at best, in genuine danger at worst.
Kayak fishing apparel isn't about looking the part. It's about staying comfortable so you can fish longer. You need to move without restriction to fight a fish without capsizing. And you need enough protection so a surprise swim stays a minor inconvenience, not an emergency.
Whether you're buying off the shelf or looking for custom kayak fishing apparel, this guide covers what to wear — layer by layer, season by season. Every piece of clothing you put on before launch should work for you, not against you.
The Kayak Fishing Layering System: Base, Mid, and Outer Layer Explained
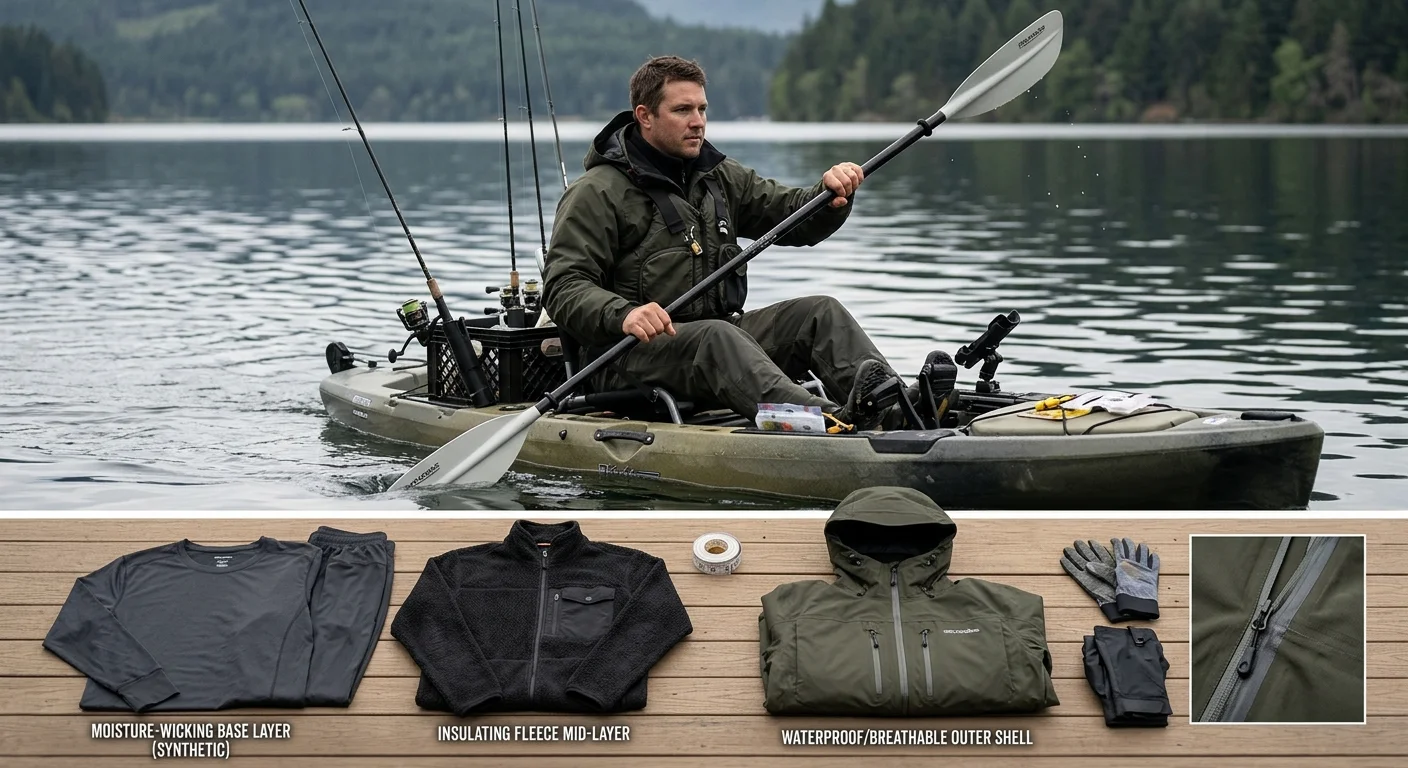
Three layers. That's the whole system. Get those three right, and you can fish in comfort through almost any condition a kayak throws at you.
Each layer has a specific job. The base layer moves sweat away from your skin. The mid layer traps warm air against your body. The outer layer blocks wind and water from destroying the work the first two layers are doing. Break that chain anywhere, and the whole system fails.
Base Layer: Your First Line of Defense Against Wet and Cold
The base layer has one job — keeping your skin dry. Not warm. Dry. Synthetic fabrics like polyester pull sweat off your skin in 10–15 minutes. They dry out in 30–60 minutes. That matters the moment you fall in. Merino wool performs even better. It holds 20–30% more warmth than cotton in wet conditions, and it won't turn stale after a full day on the water.
Never wear cotton as a base layer. Cotton soaks up to 27% of its own weight in water and holds every drop. Add wind to that, and you're looking at a real hypothermia risk.
Fit matters too. Your base layer should sit snug against your skin without locking up your movement. Pay close attention to the shoulders and chest. Paddle strokes need your full range of motion, so nothing can bind in those areas.That's also why an experienced fishing apparel manufacturer pays close attention to fabric selection, seam construction, and ergonomic fit for paddling comfort.
Mid Layer: The Engine of the System
The mid layer does the heavy lifting on warmth — it covers 60–80% of your system's total insulation. Fleece is the most practical starting point. Lightweight fleece works well in 5–15°C conditions. Step up to heavier options like AFTCO 's Reaper microfleece and you push into sub-zero territory.
Synthetic puffy jackets — like the Patagonia Nano Puff — are a solid investment for cold-water kayak fishing. The key reason: they hold insulation even after getting wet. Down runs warmer for still situations like sitting at anchor. But soak it through, and it loses all insulating value fast.
Outer Layer: Keep the Elements Out
The outer shell does two things. It blocks wind. It stops water from reaching your mid and base layers. For serious kayak fishing, that means a Gore-Tex shell or an equivalent waterproof-breathable membrane rated at a minimum 10,000mm hydrostatic head . Breathability is not optional — a shell that can't vent turns your whole layering setup into a sweat chamber during hard paddling.
In the coldest and wettest conditions, a dry suit worn over wool or fleece underlayers is the go-to setup for experienced kayak anglers. It's the setup that separates an unplanned swim from a survival situation.
What To Wear Kayak Fishing in Warm & Hot Weather: Full Outfit Breakdown
Sun on open water hits different. UV rays bounce off the surface and can double your total exposure — that bare forearm resting on the gunwale takes heat from above and below at the same time. Sunscreen alone won't save you out here. You need a full system.
Warm-weather kayak fishing gear comes down to five things: UV protection, quick-dry performance, breathability, light weight, and full coverage of every exposed zone.
Build Your Hot-Weather Outfit From the Top Down
Shirt — Go Long Sleeve, Every Time
Long sleeve wins. No debate. A UPF 50+ long-sleeve fishing shirt gives you solid, uninterrupted coverage with no reapplication needed. High-end options reach UPF 200+ , blocking over 99% of UV — UVA transmission drops below 0.5% and UVB below 0.4%. Sweat through it, splash water on it, wipe your hands across your arms — the protection holds. Short sleeves plus sunscreen can work for a two-hour cloudy morning. For a full day under a noon sun, that combo fails by 10 a.m.
Check shirts with underarm mesh panels and laser-perforated back yokes . Those details separate a shirt that breathes from one that just traps heat.
Pants — Lightweight, Fast-Drying, Mobile
Go with quick-dry fishing pants, not shorts. Your thighs and knees stay exposed in a kayak seat for hours. Look for a breathability rating of 200 mm/s or higher , a relaxed cut through the seat and thigh, and fabric that dries fast after a wet re-entry.
Hat — Wide Brim, Neck Coverage
A brim that skips your ears and neck is just decoration. Pick a wide-brim hat with a rear neck cape , or a performance cap with a built-in neck flap. On the water, direct facial shade is the fastest protection you can add.
Polarized Sunglasses — Non-Negotiable
UV400-rated polarized lenses do two things: they protect your eyes and cut surface glare that hides structure, line movement, and fish. This is the one piece of gear where "good enough" costs you actual fish.
Gloves, Neck Gaiter, and Footwear
Sun gloves — thin, open-finger cut, with non-slip palms for paddle control
Ice-fabric neck gaiter — covers your chin, neck sides, and lower jaw during peak afternoon hours
Closed-toe water shoes — draining soles, solid grip, fast-dry build; a flat sandal on a wet kayak deck is a real hazard
The Two Go-To Combinations
High-Protection Build: UPF 50+ long-sleeve shirt + quick-dry pants + wide-brim hat with neck flap + polarized sunglasses + neck gaiter + water shoes
Hot-Day Lightweight Build: UPF 50+ ultralight long-sleeve + thin quick-dry pants + sun cap + polarized sunglasses + open-finger sun gloves + water shoes
The gap between the two is weight and airflow — not protection. Both keep you covered. Pick based on how hard you're paddling and how much heat your body is putting out.
Cold Water & Winter Kayak Fishing Outfit: Drysuit, Waders, and Layering Guide
Here's the rule serious cold-water kayak anglers live by: add the air temperature and water temperature together (in ° f ). If that number is under 120, you dress for immersion — full stop.
Water temperature 55°F, air temperature 60°F? That's 115. You're in dry suit territory. This isn't paranoia either. At 55°F water, muscle control starts failing in 10–15 minutes without proper immersion gear. Your hands stop cooperating. Self-rescue becomes impossible. The math is unforgiving.
Drysuit vs. Waders + Dry Top: Know the Difference Before You Choose
These two options take different approaches to cold-water protection. They are not interchangeable, and one is safer than the other in certain situations.
A one-piece drysuit — like the NRS Eclipse in 4-layer fabric, running $800–$1,200 — creates a sealed system from neck to ankle. Latex or neoprene gaskets at the neck, wrists, and ankles mean a capsize stays an inconvenience. Water never reaches your underlayers. The logic is simple and airtight.
A waders + dry top combination costs less. Breathable waders run $150–$300 , a quality dry top runs another $150–$350 , so the total lands around $300–$650 . The trade-off is structural. That waist junction — where top meets waders — is a potential entry point during a long time in the water. Add a wading belt cinched tight over a double inner skirt and a front-entry PFD. You get a workable system for near-shore fishing in transitional weather. For solo winter fishing far from shore, the drysuit's single sealed unit earns its price premium.
Bottom line: A drysuit costs 1.2–2× more. What you're buying is a simpler seal and a higher survival margin if things go wrong.
Winter Layering: Head to Foot
The layering system under your drysuit matters as much as the suit itself. Cold water protection is only as good as what's managing your body heat underneath.
Upper Body
- Base: Fitted polyester or merino wool top, 150–200 g/m². No cotton. Ever.
- Mid: A wool Henley or lightweight 100–200 weight fleece adds 20–40 minutes of tolerable cold exposure in 0–10°C conditions.
- Outer: The drysuit seals everything — neck, wrists, ankles — keeping you dry if you go in.
Lower Body
- Base: Quick-dry long underwear or merino wool tights, 150–250 g/m².
- Mid: Thin fleece or softshell pants for extra insulation.
- Outer: Drysuit pants in 3–4 layer waterproof-breathable fabric, rated ≥10,000mm hydrostatic head and ≥10,000 g/m²/24h breathability.
Hands
A thin wool or fleece glove inside a 2–3mm neoprene paddling glove buys you critical time. Cold water hits fine motor control fast — tying knots, working a reel, gripping a paddle all start breaking down within 5–10 minutes of exposure. The extra neoprene layer extends that window.
Head and Neck
Wear a thin moisture-wicking cap under a low-profile wool toque. The drysuit hood goes over both. This isn't about comfort. The head and neck lose heat fast and are prime spots for cold shock. Double coverage here is non-negotiable.
Feet
Got integrated socks in your drysuit? Start with a thin merino sock as a base. Add a waterproof insulated sock (like SealSkinz) as a mid layer. Then wear a kayak boot sized half to one full size up to fit the extra bulk.
The Mistake That Gets People Into Trouble
New kayak anglers dress for the air temperature they feel standing on the dock. Experienced ones dress for the water temperature they'd be swimming in. A sunny 75°F morning with 52°F water is still a cold-water emergency without immersion gear. Plan your outfit around the swim scenario — not the launch scenario.
Also, no matter what outer layer system you pick: wear your PFD. Every time. No clothing system makes up for the absence of a personal flotation device. That single habit is what separates a recoverable situation from one that isn't.
PFD and Footwear: The Two Safety Items That Can't Be Compromised
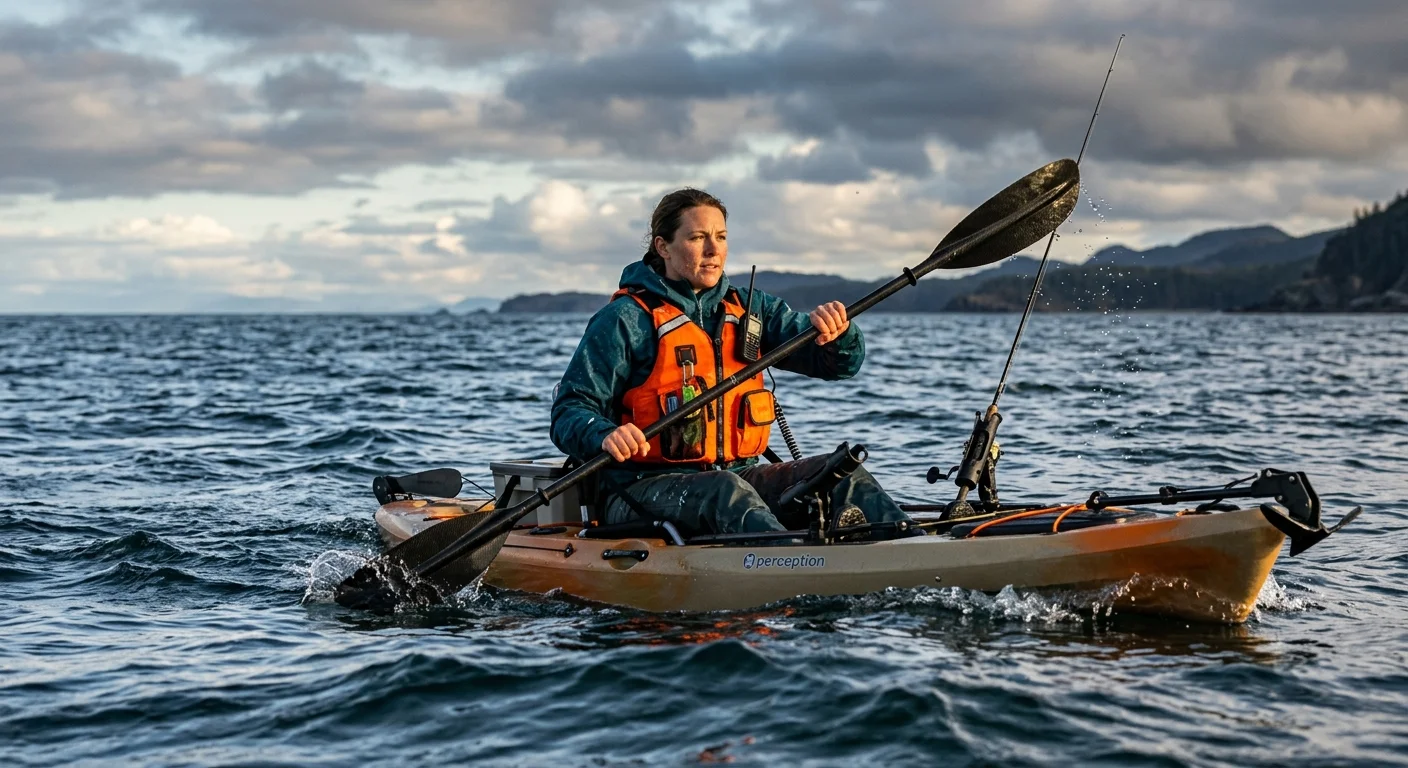
Every piece of clothing in this guide involves trade-offs — weight versus warmth, coverage versus breathability, cost versus performance. These two items are different. You wear them right, every single time, or you face consequences that no skill or experience can undo.
Your PFD: Not a Suggestion, Not a Backup Plan
The debate between inflatable and foam PFDs comes down to one question: what happens at the worst possible moment?
Foam PFDs give you buoyancy the instant you hit the water. No cord to pull. No CO₂ cartridge to fire. No mechanical sequence to run through while cold water triggers your gasp reflex. In water below 15°C, that gap in time matters a lot. Cold shock causes involuntary gasping and immediate loss of breathing control within seconds of immersion. Your head needs to be above water before your brain catches up with what just happened.
Inflatable PFDs offer real comfort and mobility advantages — especially on calm, warm-water days. But they come with non-negotiable upkeep. Check the CO₂ cartridge visually. Verify the pressure indicator. Replace the cartridge after every actual inflation. Skip those steps and you're not wearing a PFD. You're wearing a vest.
The practical rule:
- Cold water, rough conditions, strong current: Foam PFD, no exceptions
- Warm, calm, flat water: Inflatable works — if you've checked it this season and can find the manual pull cord without looking
One more thing. In most jurisdictions, certain Type V PFDs are legal only while you're wearing them — not clipped to your kayak, not stowed under your seat. More than 50 meters from shore, in water deeper than your chest, wearing time is 100%. Zero minutes off.
Footwear: The Overlooked Hazard
Flip-flops kill the entry and exit. That's not an exaggeration — that's just how it works. A flat EVA sole with no heel retention on a wet fiberglass deck or mossy rock face is a fall waiting to happen. Your ankle gets zero support. One unexpected weight shift and you're either in the water or on the ground.
Here's what good kayak fishing footwear needs to deliver:
High-friction rubber outsole with multi-directional tread — test it by doing a quick stop on wet concrete before your first launch
Quick-dry mesh upper with drainage ports — full saturation should air-dry within four hours; a wet cotton sock inside a soaked sneaker pulls heat from your feet faster than most anglers expect
Mid-height ankle collar with lateral reinforcement — enough structure to stop a sudden twist, enough flex to let you kneel, pivot, and climb back in
Match the terrain:
- Rock and reef — deep-lug rubber outsole, reinforced toe cap, mid-high collar
- Sand and flats — lightweight water shoe with good drainage, low-profile tread
- Dock and boat deck — non-marking rubber sole, solid arch support for long hours on your feet
Cotton socks make things worse. They soak up water, stay wet, and pull heat away from your feet the entire session. In cold conditions, that speeds up full-body temperature loss and dulls your judgment before you notice either is happening. Go with merino wool or synthetic instead — both hold at least some insulating value even when soaked.
The PFD keeps you afloat if you go in. The footwear keeps you from going in. Neither one is where you cut corners.
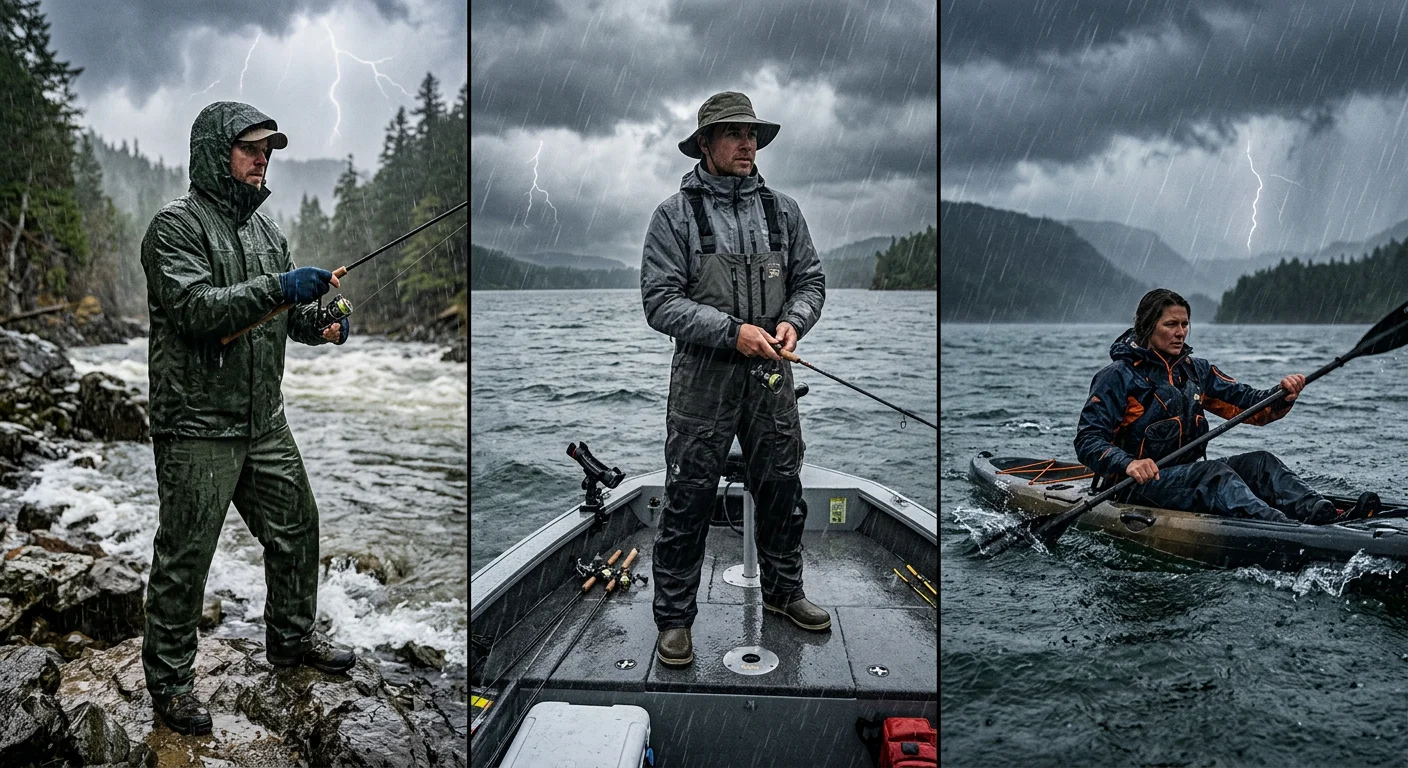
Kayak Fishing Clothing for Rain and Wind: Staying Dry and Warm on the Water
Rain changes everything. Wind on open water pulls heat from your body faster than wet fabric does. On a kayak, you face both at once.
The priority order for rain and wind is clear: warmth first, waterproofing second, breathability third. Most anglers get this backwards. They layer up on the outside and ignore the middle. They stop paddling to land a fish. The wind hits. The cold sets in fast — before the problem even registers.
Dedicated Rain Shell vs. Standard Rain Jacket
Not all waterproof jackets perform the same on the water. Here's what matters for kayak fishing:
Sealed seams and DWR coating — the outer fabric needs to bead water, not soak it in. Once the surface gets saturated, breathability drops fast.
Windproof construction — wind chill on a kayak is relentless. A jacket that passes waterproof testing will block wind too. That's the combination you need.
Paddling-specific fit — loose cuffs and a short hem cause real problems. Rain runs down your arms into the kayak. Wind catches the hem and pushes it up. Look for adjustable cuffs, a longer back hem, and a stable hood that holds its position as you turn to cast.
Full coverage — an upper shell alone leaves your waist, seat, and upper thighs open to splash and rain bounce. A matched rain pant or bib pant closes that gap.
Layering Order for Rain and Wind
Step 1 — Build your insulation first. Put on your fleece or lightweight synthetic mid layer before the shell goes on. Hypothermia risk in cold rain can hit before you look soaked.
Step 2 — Seal the outside. Your shell stops wind and rain from tearing apart everything underneath. It's not the warming layer — it's the layer that protects the warmth.
Step 3 — Manage breathability last. In heavy rain and strong wind, holding warmth in matters more than pushing sweat out. Keep your DWR coating in good shape — it helps your shell breathe longer.
What Goes in the Dry Bag
Pack these items every time, no exceptions:
Backup mid layer — a lightweight fleece top is the top-priority item in the bag
Dry socks — foot warmth affects full-body temperature faster than most anglers expect
Spare gloves — wet hands in cold wind kill your grip and dexterity fast
Packable rain pants — the upper shell alone isn't always enough; lower-body coverage seals the system
Lightweight hat or balaclava — your head loses heat fast in wind and rain; a spare hat takes almost no space
Two Practical Setups
Mild rain day: Quick-dry base layer + fleece mid layer + waterproof-breathable shell + dry socks in the bag.
Cold rain and strong wind: Insulating base layer + heavier fleece or synthetic mid + high-rated rain jacket with bib pants + backup gloves and hat within reach.
The difference between the two comes down to how much insulation sits under the shell — not the shell itself. Conditions get tighter, you add in the middle. Not on the outside.
Sun Protection Beyond SPF: Hats, Buffs, Gloves, and Polarized Sunglasses for Kayak Anglers
Open water at midday hits a UV index of 8 to 11+. Unprotected skin burns in 15 to 25 minutes. You're not just catching rays from above, either. Water reflection adds another 20 to 30% to your total UV dose. By hour four of an eight-hour session, your face, neck, and hands have absorbed the equivalent of a full day in direct sun. Twice over.
Sunscreen alone can't carry that load. It degrades. You sweat through it. You forget to reapply. Anglers who come home without a burn aren't using more sunscreen. They're wearing a system that does most of the protection work before sunscreen even matters.
Hat: Match the Coverage to the Cap
A baseball cap covers your forehead and part of your nose. Everything else — ears, cheeks, jawline, neck — stays exposed. That's a real problem when you're looking down to work a lure or leaning into a paddle stroke.
A wide-brim hat with a brim of at least 3 inches changes things. It throws real shade across your ears, nose, cheeks, and upper neck. That's not a minor upgrade. Those are the exact zones where kayak anglers collect the most sun damage over a season.
Prefer a cap? It still works — but pair it with a Buff to cover what the cap leaves open.
Buff: The Piece Most Anglers Skip
A UPF 50+ neck gaiter or Buff blocks 98% of UV across every surface it covers — neck, lower face, ears, sides of jaw. As a seated paddler, those zones face two UV sources at once: the sun from above and the reflected glare bouncing off the water from below. That under-chin and lower-neck area is where anglers get burned without ever figuring out why.
Pull the Buff up over your nose and ears. You've now closed almost every blind spot a baseball cap leaves open. Keep it snug during peak hours. Don't loosen it as the sun gets high. That's the point when reflected UV off the water surface is most aggressive.
The remaining gaps — nose tip, lips, under-chin — get SPF 50–70 sunscreen. Reapply every one to two hours.
Sun Gloves: Your Hands Are a High-Risk Zone
Dermatology data is clear: the backs of hands are a high-incidence skin cancer site in anglers. It makes sense. Your hands grip a paddle or rod handle all day, palms down, backs facing upward into direct sun for hours straight.
UPF 50+ fingerless fishing gloves fix this. They block 98% of UVA and UVB — wet or dry. The fingerless cut keeps enough grip sensitivity for knot-tying, reel work, and paddle control. Your exposed fingertips still need SPF 30–70 sunscreen. One practical tip: wet your gloves before handling fish. It protects the fish's slime coat. Make it a habit from the start.
Polarized Sunglasses: Eye Health and Fish-Finding in One Piece
UV400-rated polarized lenses block 100% of UVA and UVB up to 400nm. Skip them, and reflected UV from the water surface can hit your corneas with several times the normal UV load. That's enough to cause photokeratitis — a sunburn on your cornea. Symptoms include pain, itching, and temporary vision loss. Not how you want to end a long day on the water.
Polarization does a second job, too. It cuts surface glare by up to 90%, letting you see what's underneath — submerged structure, cruising fish, depth transitions, weed lines. A dark non-polarized lens just dims everything. The surface still looks like a bright mirror. A polarized lens cuts through that. You stop guessing where fish are and start seeing them.
Wrap-style frames block side-entry UV and extend your field of view. This isn't an accessory. It's a core piece of kayak fishing gear.
How the Full System Fits Together
Each piece covers what the others miss:
Wide-brim hat : overhead sun to forehead, nose, cheeks, eyes
Buff : ears, neck, lower face, reflected UV from below
UPF 50+ hooded shirt : backs up hat and Buff on neck sides and top of ears
Fingerless sun gloves : backs of hands and most fingers
Polarized UV400 sunglasses : corneas, eyelids, upper cheeks
SPF 50–70 sunscreen : nose tip, lips, fingertips, under-chin, any skin the fabric doesn't reach — reapplied every one to two hours
No single item does the whole job. Stack them right, and you've built a protection system that holds up across a full day — not just the first two hours before the sunscreen sweats off.
Common Kayak Fishing Clothing Mistakes (And What To Wear Instead)
Bad gear decisions don't announce themselves at the dock. They show up two hours out — your cotton hoodie is soaked through and the wind won't quit.
Most of these mistakes are common. All of them are preventable.
Wearing cotton. Cotton absorbs up to 2–3 times its own weight in water and holds every drop. "Cotton kills" isn't just an outdoor cliché — it's a real warning about hypothermia risk. Swap it for 100% polyester or nylon. A quick-dry UPF long-sleeve and lightweight synthetic pants dry in under an hour. Cotton does not.
Dressing for air temperature instead of water temperature. A sunny 70°F morning feels fine on the dock. It's not fine once you're in 50°F water. Add both numbers — air temp plus water temp. Total under 120°F? You're in cold-water territory. Wear a drysuit or wetsuit, not a fleece pullover.
A loose, unbuckled PFD. The U.S. Coast Guard data shows 79% of drowning victims in small boat accidents weren't wearing their PFD right. A PFD clipped to your kayak is just decoration. Wear it fastened and fitted. Shoulder straps shouldn't ride above your ears when pulled upward.
Flip-flops or open sandals. Wet fiberglass and mossy launch ramps are unforgiving. Flat soles with no heel retention will fail you. Wear closed-toe water shoes with drainage ports and a high-grip rubber outsole. In cold conditions, add a neoprene wetsuit boot sized up to fit over insulating socks.
Skipping sun coverage. At UV index 8 and above — standard midday summer conditions on open water — unprotected skin burns in 15–25 minutes. A tank top and shorts won't carry you through a full day. A UPF 50+ long-sleeve shirt, quick-dry pants, wide-brim hat, and polarized sunglasses will.
One thick layer instead of a system. A single heavy sweatshirt traps sweat as you paddle. Then it turns cold the moment you stop. Three layers fix this: moisture-wicking base, insulating mid, waterproof outer. You get the flexibility to manage heat across a full session. One thick layer gives you none of that.
Quick self-check before launch: Any cotton touching your skin? Replace it. Checked air temp but not water temp? Look it up now. PFD buckled and snug? Confirm it before you push off.
Pre-Launch Clothing Checklist: What To Check Before Every Kayak Fishing Trip
Five minutes at the ramp. That's all this takes. Run through these checks before you push off. Every piece of gear you picked will do its job.
1. PFD — On your body, strapped down tight
Put it on before you load the kayak. Buckle every strap. Running an inflatable? Check the CO₂ cartridge indicator. Make sure the pull cord is easy to reach. A PFD clipped to your deck bungees does nothing for you.
2. Base layers — Zero cotton
Feel what's touching your skin. Synthetic or merino wool only. Find anything cotton — shirt, socks, underwear — swap it before you launch.
3. Immersion protection — Matched to water temperature, not air temperature
Check the water temp, not just the forecast. Under 60°F means drysuit or wetsuit, no exceptions. Inspect gaskets for tears. Close every zipper all the way. A small gap in a gasket or zipper lets cold water in fast.
4. Sun protection — Three-point coverage confirmed
UPF long-sleeve shirt. Hat with a retainer leash. SPF 30+ sunscreen applied, SPF 15+ lip balm on. Polarized sunglasses fitted with a strap. All four items in place before you sit down.
5. Footwear — Grip tested, closures secure
Press your sole against the wet dock. It slides? Fix it now. Laces or straps need to hold through a capsize. Flip-flops fail that test right away — leave them on shore.
6. Dry bag — Packed and stowed within reach
Pack one full change of clothes at minimum: top, bottom, socks, hat. Seal everything inside a dry bag. Stow it where you can grab it after a swim — not buried under rods and tackle.
7. Final movement check
Sit down. Twist. Simulate a cast. Anything binds at the shoulders, rides up at the waist, or pinches through the hips? Fix it now. Mid-paddle is the wrong time to deal with that.
Everything checks out? Launch.
Conclusion
Kayak fishing rewards the prepared and punishes the careless. That's never more true than in what you choose to wear before you touch a paddle.
Here's what you now have:
- A layering system that works in any condition
- Season-specific outfits that keep you comfortable and mobile
- Safety gear that could one day save your life
A great trip or a miserable one? That gap often comes down to choices you made in your driveway — not on the water.
So before your next launch, run the checklist. Check the water temperature, not just the air. Layer with purpose. Protect your skin, secure your PFD, and dress like someone who plans on coming home.
Ready to build out your kayak fishing apparel kit? Explore the full fishing apparel collection at RunFish Apparel — gear built for anglers who take their time on the water seriously.
Dress smart. Fish better. Stay safe.